VaZsu PSP Tutorials
  • Home
  • Looking Back
  • Tutorials 5
    • TUTORIALS 231 - 240 >
      • VaZsu Tutorial 231
      • VaZsu Tutorial 232
      • VaZsu Tutorial 233
      • VaZsu Tutorial 234
      • VaZsu Tutorial 235
      • VaZsu Tutorial 236
      • VaZsu Tutorial 237
      • VaZsu Tutorial 238
      • VaZsu Tutorial 239
      • VaZsu Tutorial 240
    • Tutorials 241 - 250 >
      • VaZsu Tutorial 241
      • VaZsu Tutorial 242
      • VaZsu tutorial 243
      • VaZsu Tutorial 244
      • VaZsu Tutorial 245
      • VaZsu Tutorial 246
      • VaZsu Tutorial 247
      • VaZsu Tutorial 248
      • VaZsu Tutorial 249
      • VaZsu Tutorial 250
    • Tutorials 251 - 260 >
      • VaZsu Tutorial 251
      • VaZsu Tutorial 252
      • VaZsu Tutorial 253
      • VaZsu Tutorial 254
      • VaZsu Tutorial 255
      • VaZsu Tutorial 256
      • VaZsu Tutorial 257
      • VaZsu Tutorial 258
      • VaZsu Tutorial 259
      • VaZsu Tutorial 260
    • Tutorials 261 - 265 >
      • VaZsu Tutorial 261
      • VaZsu Tutorial 262
      • VaZsu Tutorial 263
      • VaZsu Tutorial 264
      • VaZsu Tutorial 265
  • Pastel Style Tutorials
    • Tutorials 266 - 270 >
      • VaZsu Tutorial 266
      • VaZsu Tutorial 267
      • VaZsu Tutorial 268
      • VaZsu Tutorial 269
      • VaZsu Tutorial 270
    • Tutorials 271 -280 >
      • VaZsu Tutorial 271
      • VaZsu Tutorial 272
      • VaZsu Tutorial 273
      • VaZsu Tutorial 274
      • VaZsu Tutorial 275
      • VaZsu Tutorial 276
      • VaZsu Tutorial 277
      • VaZsu Tutorial 278
      • VaZsu Tutorial 279
      • VaZsu Tutorial 280
    • Tutorials 281 - 290 >
      • VaZsu Tutorial 281
      • VaZsu Tutorial 282
      • VaZsu Tutorial 283
      • VaZsu Tutorial 284
      • VaZsu Tutorial 285
      • VaZsu Tutorial 286
      • VaZsu Tutorial 287
      • VaZsu Tutorial 288
      • VaZsu Tutorial 289
      • VaZsu Tutorial 290
    • Tutorials 291 - 300 >
      • VaZsu Tutorial 291
      • VaZsu Tutorial 292
      • VaZsu Tutorial 293
      • VaZsu Tutorial 294
      • VaZsu Tutorial 295
      • VaZsu Tutorial 296
      • VaZsu Tutorial 297
      • VaZsu Tutorial 298
      • VaZsu Tutorial 299
      • VaZsu Tutorial 300
    • Tutorials 301 - 400 >
      • VaZsu Tutorial 301
      • VaZsu Tutorial 302
      • VaZsu Tutorial 303
      • VaZsu Tutorial 304
  • Bouquet Editing
    • VaZsu Bouquets
    • Bouquet Tutorials 1. >
      • Whisper About Fall
      • Sweet Things
      • Romantic Bouquet
      • Burgundy Beauty
      • Precious Moments
      • Lovely Vintage
      • Autumn Feeling
      • Tender Memory
      • Grey Miracle
      • My Darling
    • Bouquet Tutorials 2. >
      • Ghotic Feeling
      • Timeless Memory
      • Little Garden
      • Moments In Time
      • Colorful Love
      • Bouquet For My Love
      • Green Valentine's
      • Sunflowers and Irises
      • Artificial Beauty
      • Magnolias For My Love
  • SINEDOT ARTS
    • Before Starts With Sinedots
    • Mi mit jelent
    • VaZsu Sinedot Tutorials >
      • Sinedot Tutorial 1
      • Sinedot Tutorial 2
      • Sinedot Tutorial 3
      • Sinedot Tutorial 4
      • Sinedot Tutorial 5
      • Sinedot Tutorial 6
      • Sinedot Tutorial 7
  • Treasures to Pastell Images
    • PNG Flowers Images
    • Exclusive Png Roses
    • Pastel blurry backgrounds
    • Watercolor painted png flowers
    • VaZsu Wild Flowers Masks
    • Dry Flowers I. PNG
    • Dry Flowers II. PNG
    • Dry Plants PNG
  • Editorial Practices
    • Make a Selection Tool
    • Creative Button 1
    • Creative Button 2
  • VaZsu Videos
    • Karácsonyi Rege
Picture

Ebben a bemutatóban ismét a kijelölésé és a promotálásé a "föszerep" az alap középsö, mutatós kialakításához.

​Image sixe: 1200 x 750 or 800 x 500

Picture
t_243_pack.rar
File Size: 4304 kb
File Type: rar
Download File

​Special thanks for my friends for translate this tutorial to French, Dutch and German language.

Picture
TRANSLATE

Animabelle - Chantal

Picture
TRANSLATE

Moonlightangel - Lisette

Picture
TRANSLATE

      KaffeeDani


Picture

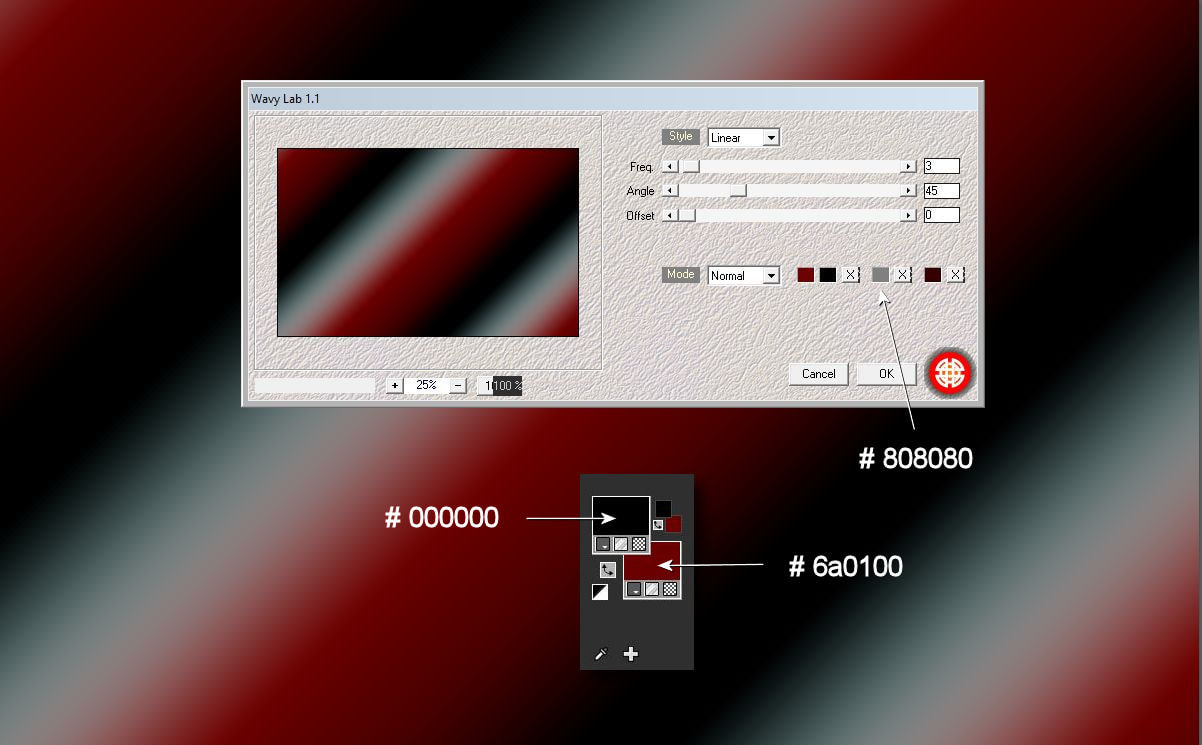
1. Hozz be egy üres alapot állítsd be a színpalettáidat és tedd rá ezt a szüröt.

  Load in teh new transparent background. Set up your color palettes.
  Effects - Plugins - Mehdi - Wavy Lab

Picture

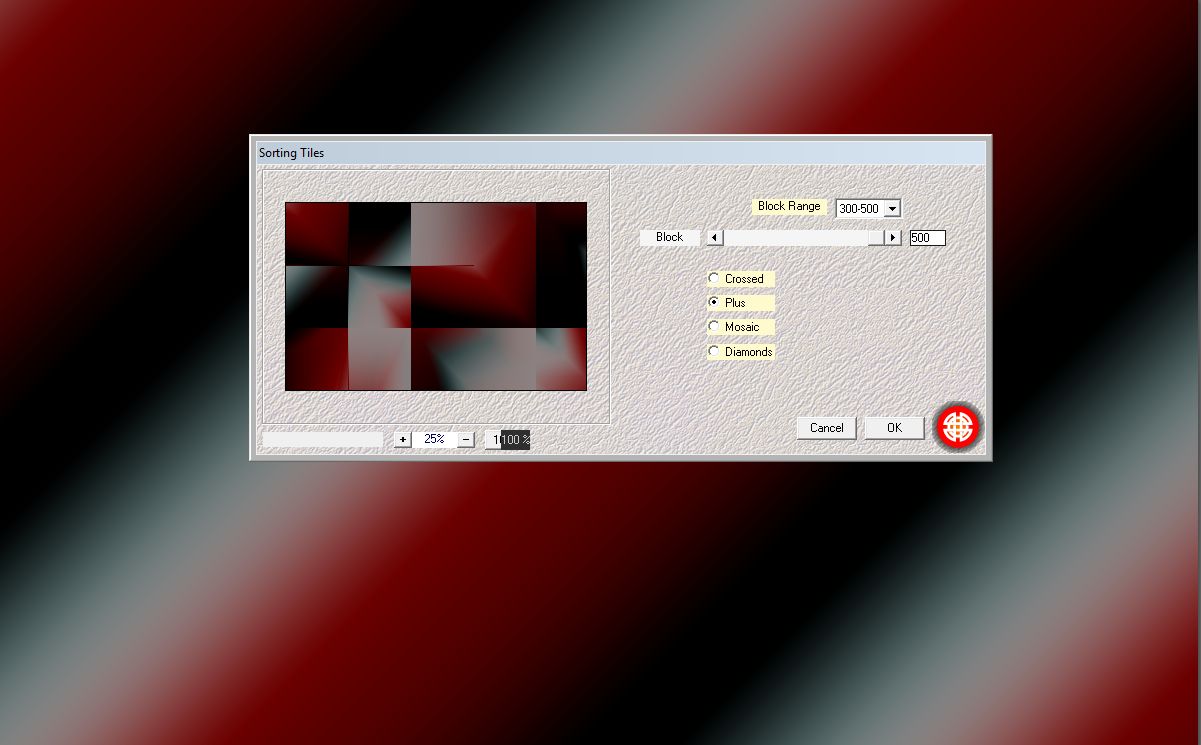
2. Effects - Plugins - Mehdi - Sorting Tiles

Picture

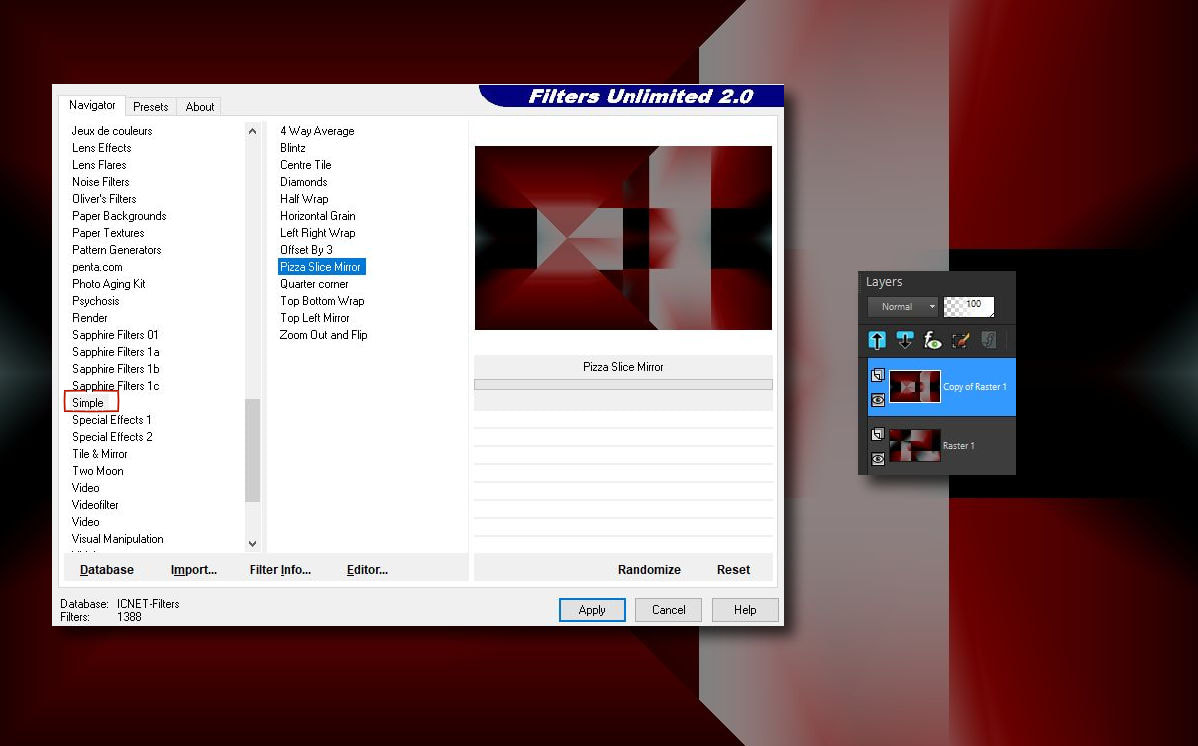
3. Duplázd meg a réteget és maradj a felsön.

   Layers duplicate. Stay on the top layer.
   Effecst - Plugins - Filters Unlimited - Simple - Pizza Slice Mirror

Picture

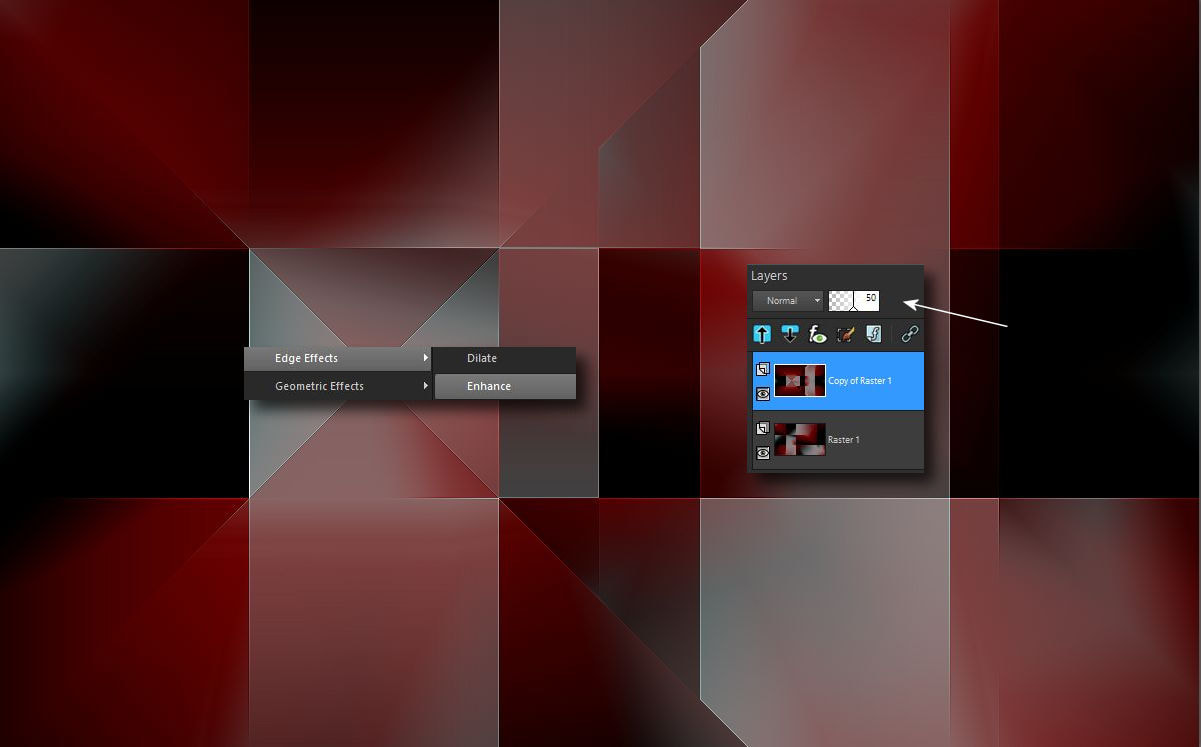
4. Felsö réteg blend mode 50%
   Enhance mindkét rétegre.
​
   Top layer blend mode 50%
   Effects - Edge effects - Enhance ( both of layers )

Picture

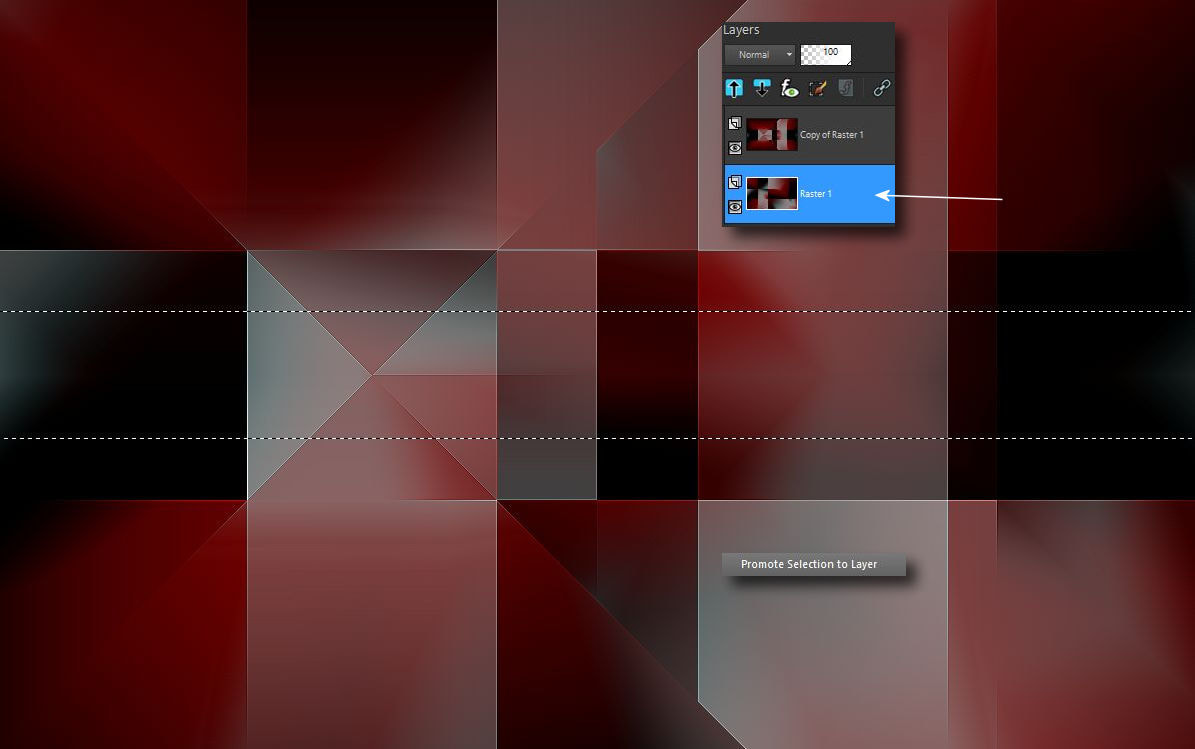
5. Állj az alsó rétegre és csináld meg ezt a kijelölést majd promotáld azt.

    Go to the bottom layer. Make a selection.
​    Selection - Promote Selection to Layer

Picture

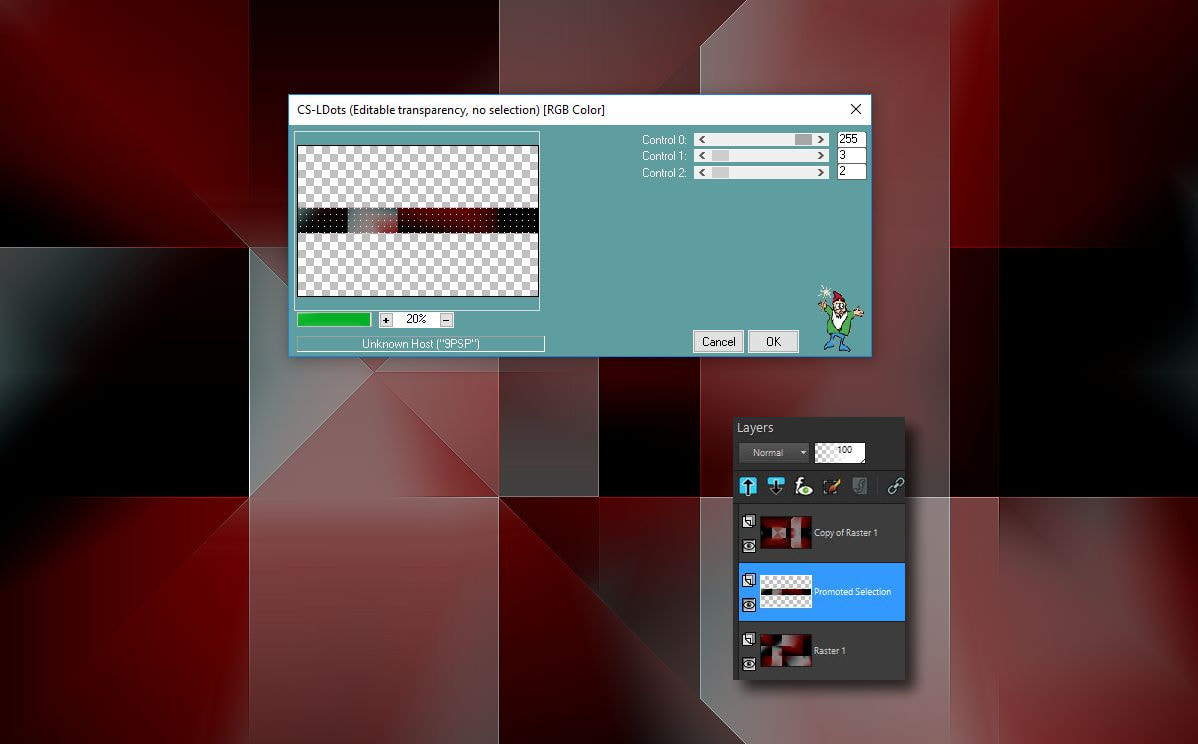
6. Tedd erre a rétegre ezt a szüröt.

​   Effects - Plugins - Caroline And Sensibility - Cs Dots

Picture

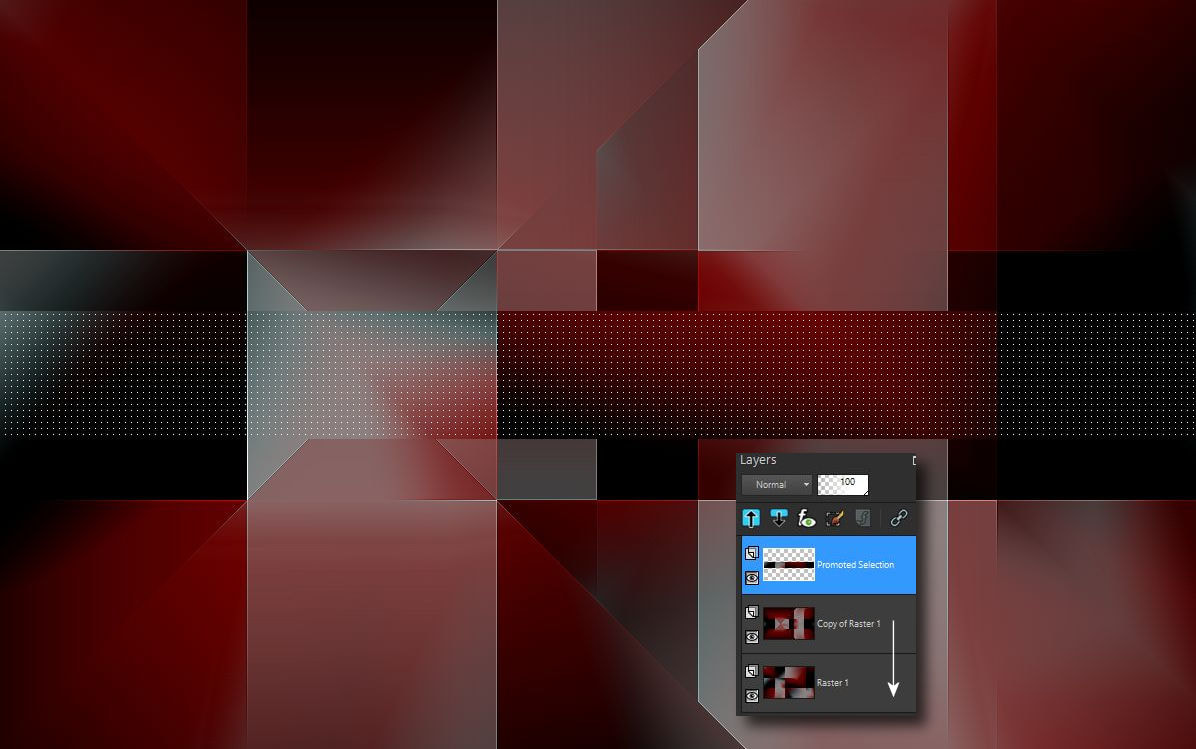
7. Vidd a promotált réteget felülre és add össze a két alsó réteget.

   Take the promoted layer to the top and merge down the two bottom layers.

Picture

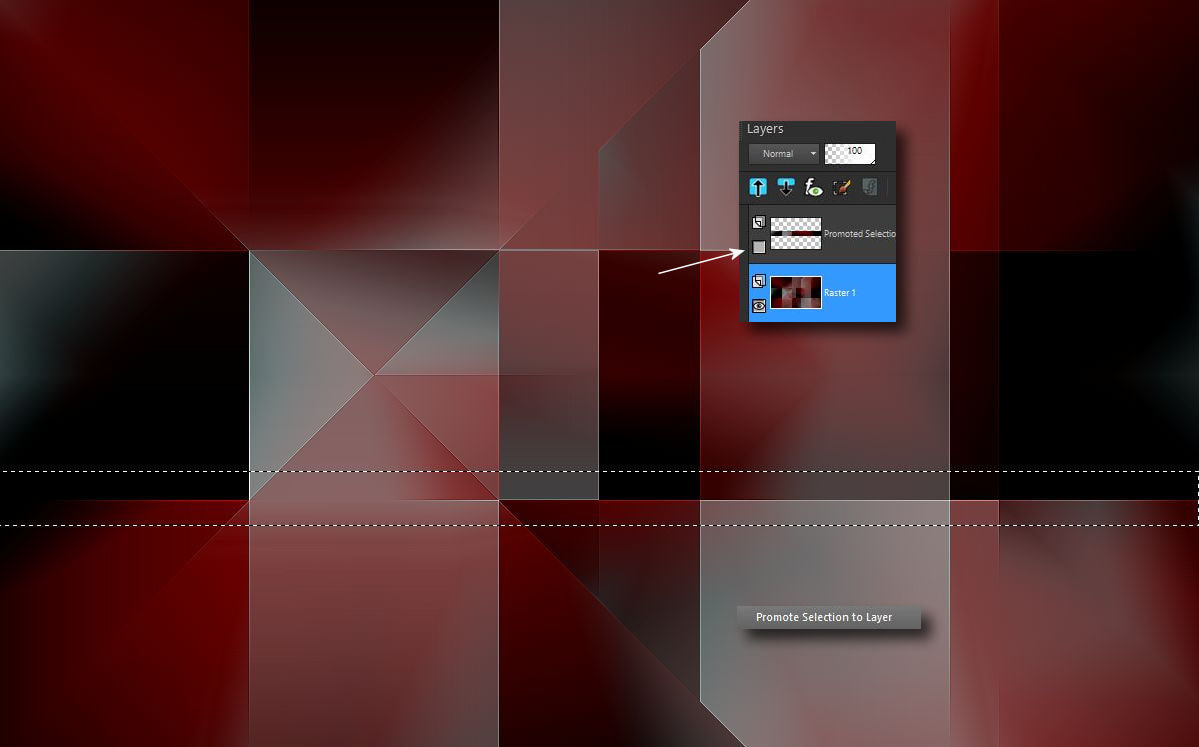
8. Csukd be a felsö rétegszemet és állj az alsó rétegre. Csináld meg ezt a kijelölést
   és promotáld azt.

    Close the eye of the top layer. Stay on the bottom layer.
    Make a selection.
    Selection - Promote Selection to Layer

Picture

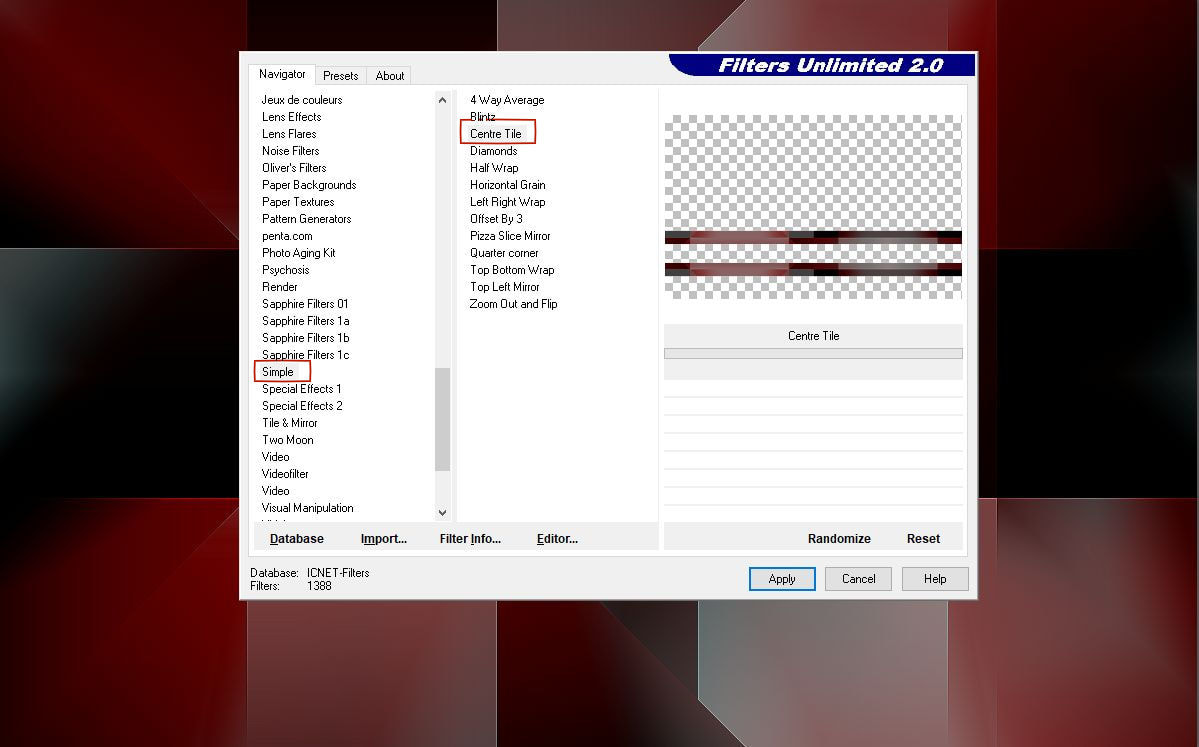
9. Effects - Plugins - Filters Unlimited - Simple - Centre Tile

Picture

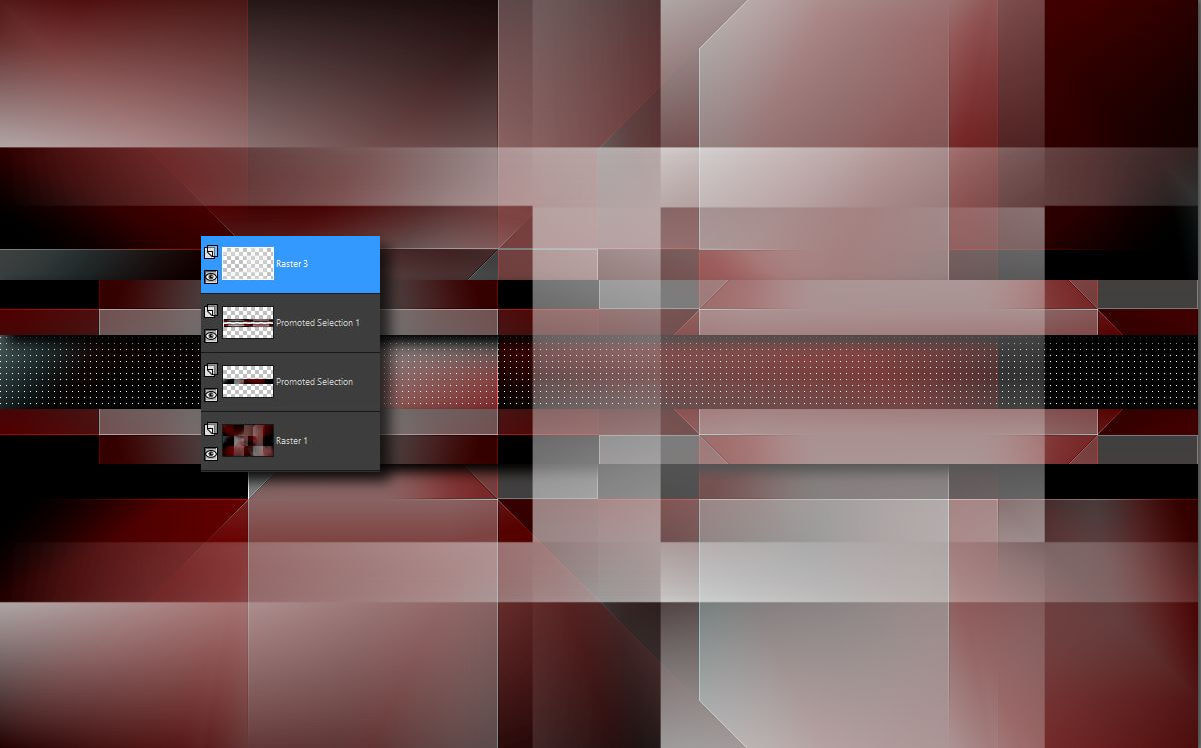
10. Három réteged van most. Vidd a dupla csíkos rétegedet felülre majd fordítsd át
    horizontálisan és adj neki árnyékot.

    You have three layers now. Move the second promoted layer to the top.
    Image - Flip - Flip Horizontal
    Effects - 3 D Effects - Drop Shadows

Picture

11. Hozd be a VaZsu Decort a csomagból és másold be új rétegként.

    Load in the VaZsu Decor from your material package.
​    Copy on it and paste as a new layer on your image

Picture

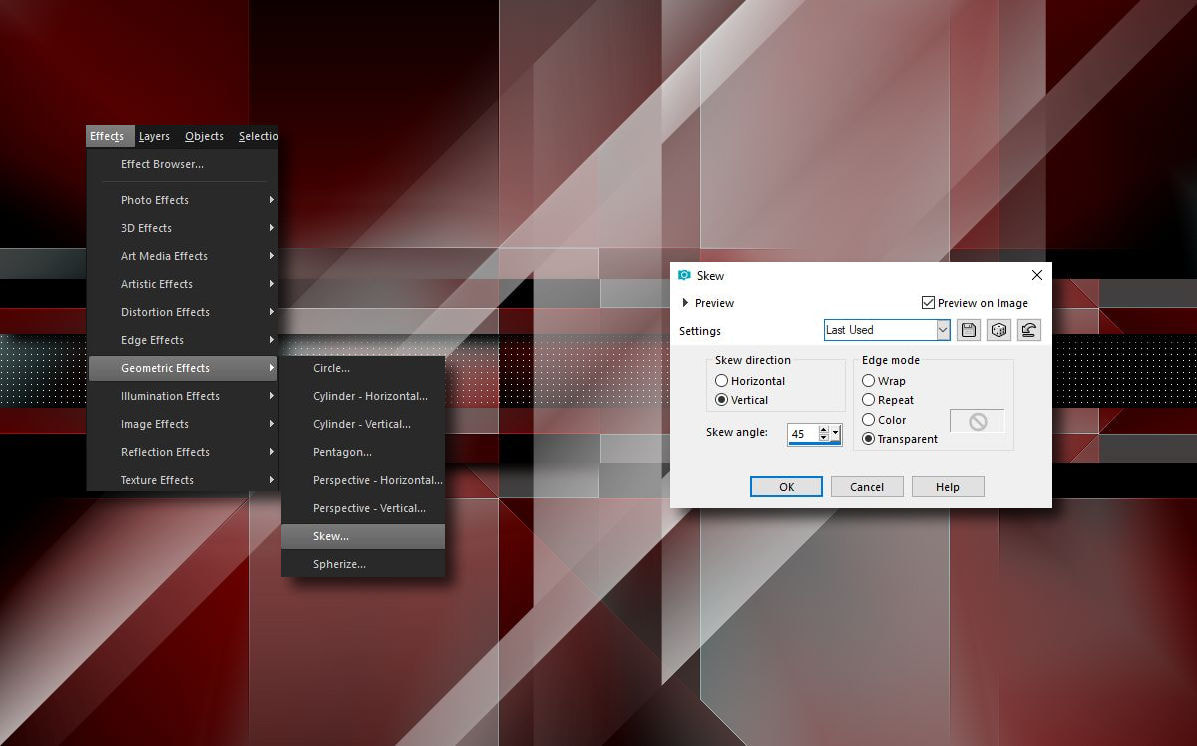
12. Effects - Geometric Effects - Skew

Picture

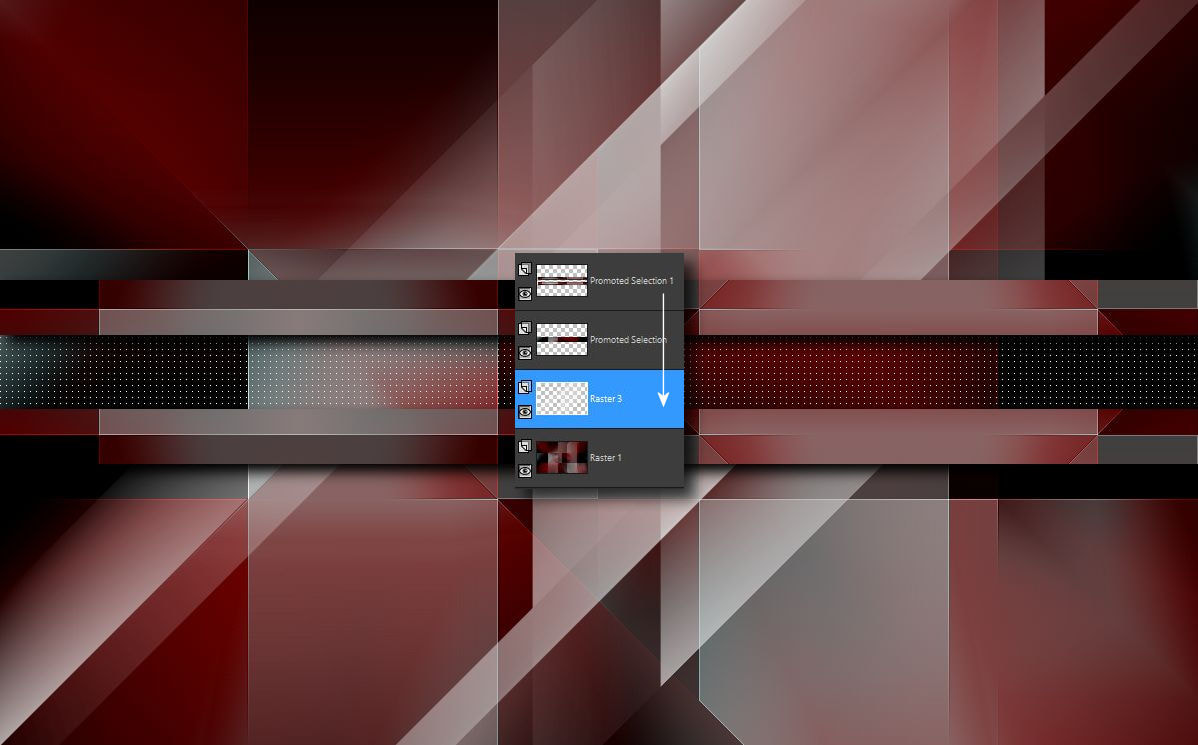
13. Vidd ezt a réteget a promotált rétegek alá.

​     Take this layer under the promoted layers.

Picture

14. Hozd be a VaZsu Circles decort a csomagból másold be a képedre és adj neki
    árnyékot.

    Load in the VaZsu Circles Decor from your material package.
    Copy on it and paste to your image as a new layer.
​    Effects - 3D effects - Drop Shadow

Picture

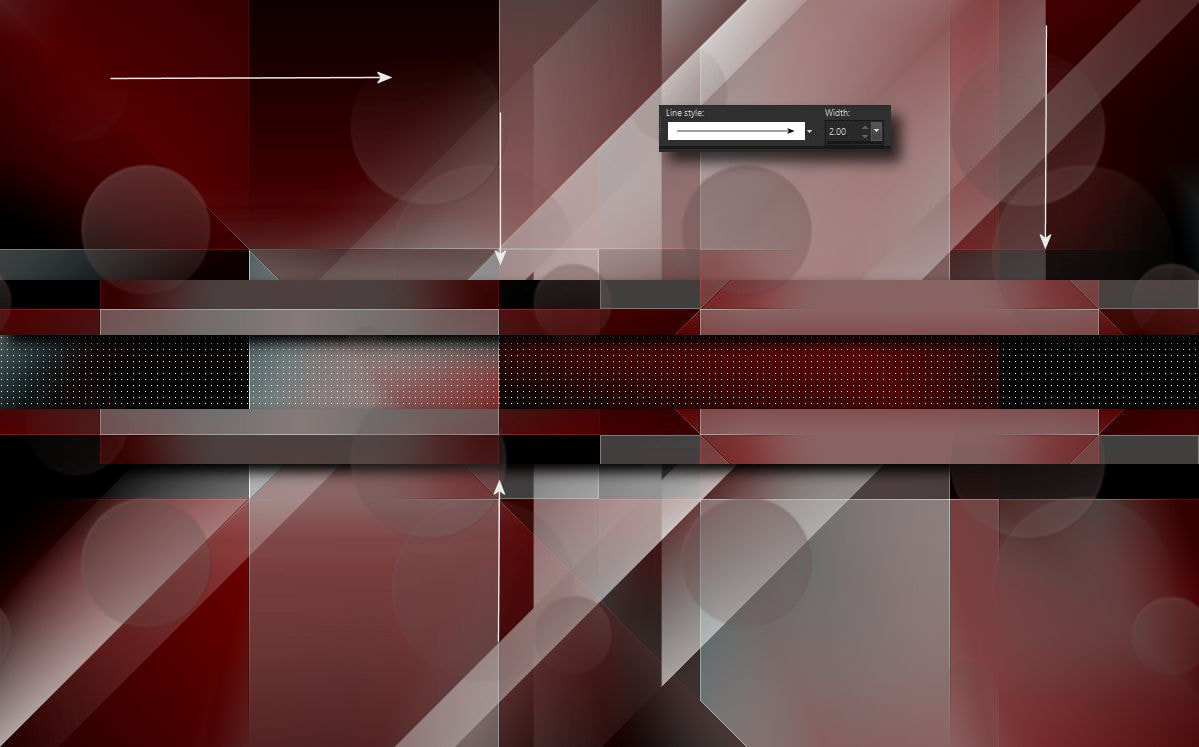
15. Húzz vonalakat a képeden 2-es méretben.

    Draw lines on your image in size 2.

Picture

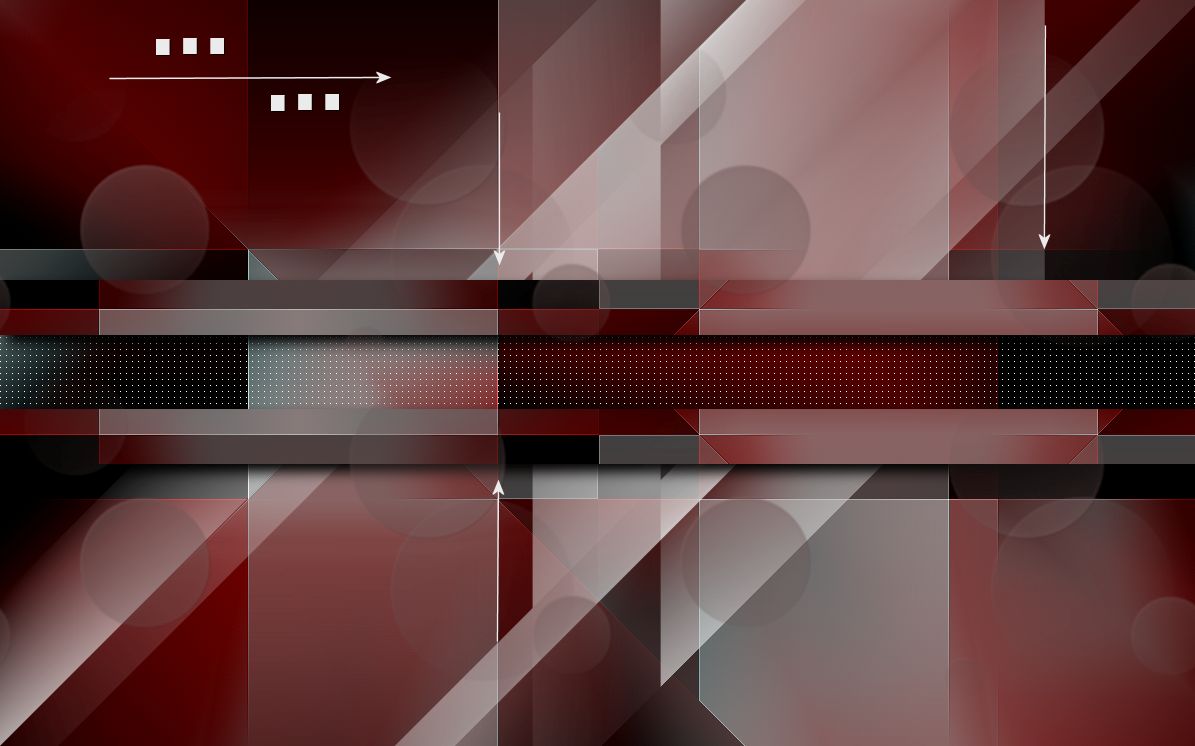
16. Helyezd el a vízszintes kockákat a képeden. Használd a duplikálást.

    Place the horizontal squares decors in your image. Use the duplicate

Picture

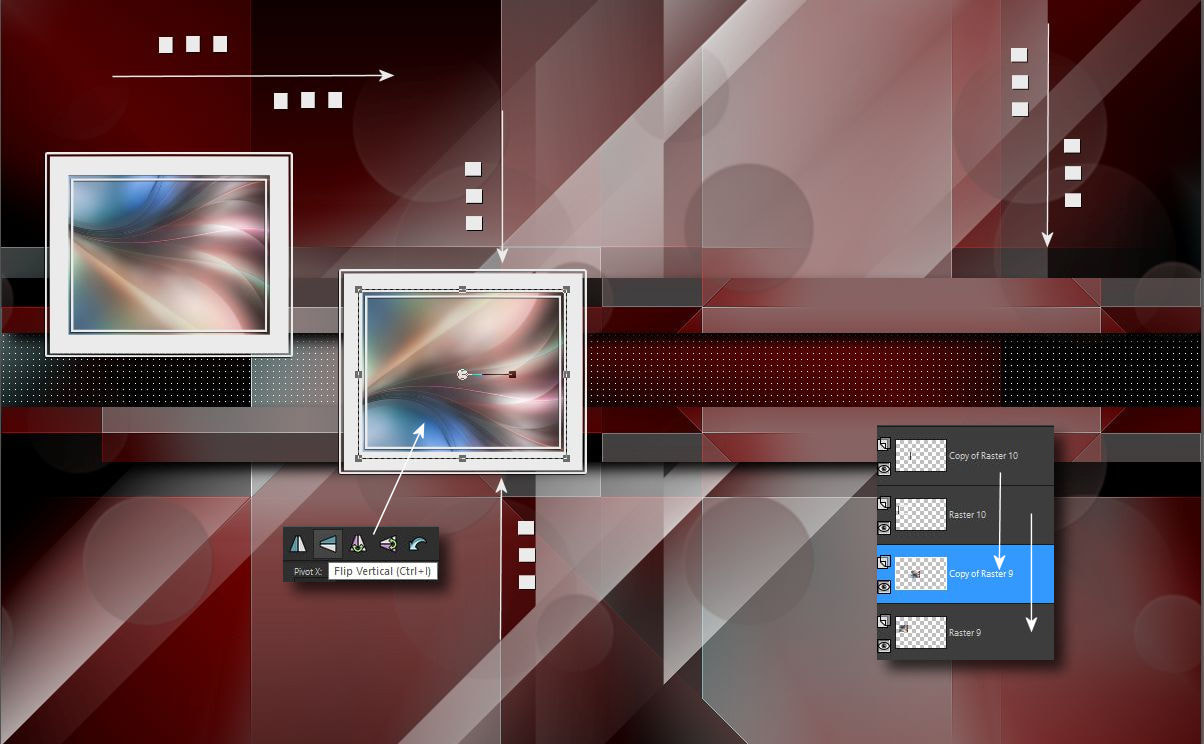
18. Helyezd el a függöleges kockákat a képeden, Használd a duplikálást.

    Place the vertical squares decors in your image. Use the duplicate

Picture

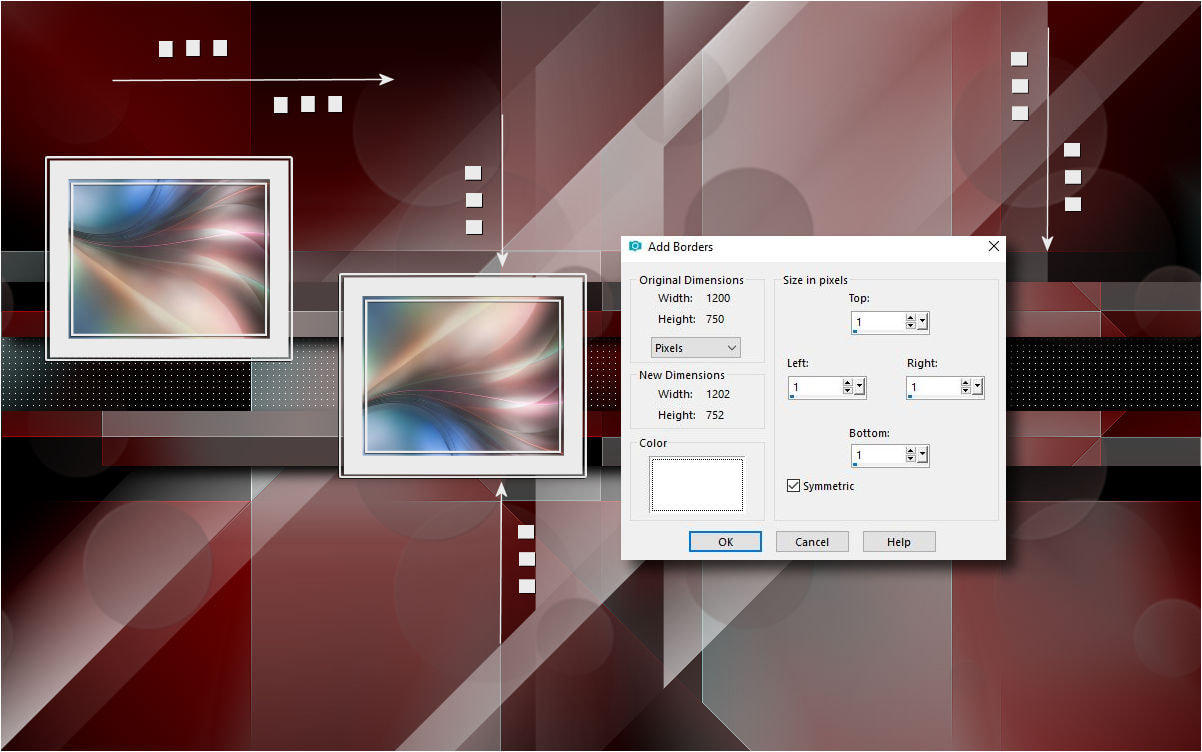
19. Helyezd el a kereteket is duplikálással a képeden.

    ​Place the frames in duplicate on your image.

Picture

20. Hozd be a csomagból az abstract képet és másold be a képedre.

     Load in the abstract from the package and copy it to your image.

Picture

21. Duplázd meg az abstract képet. Fordítsd át vertikálisan a másodikat.
    Mindkét kép réteget vidd a keretrétegek alá.

    Duplicate the abstract picture. 
    Image - Flip - Flip Vertical
    Take the both of image layers under the frame layers.

Picture

22. Image - Add Borders ( color is white )

Picture

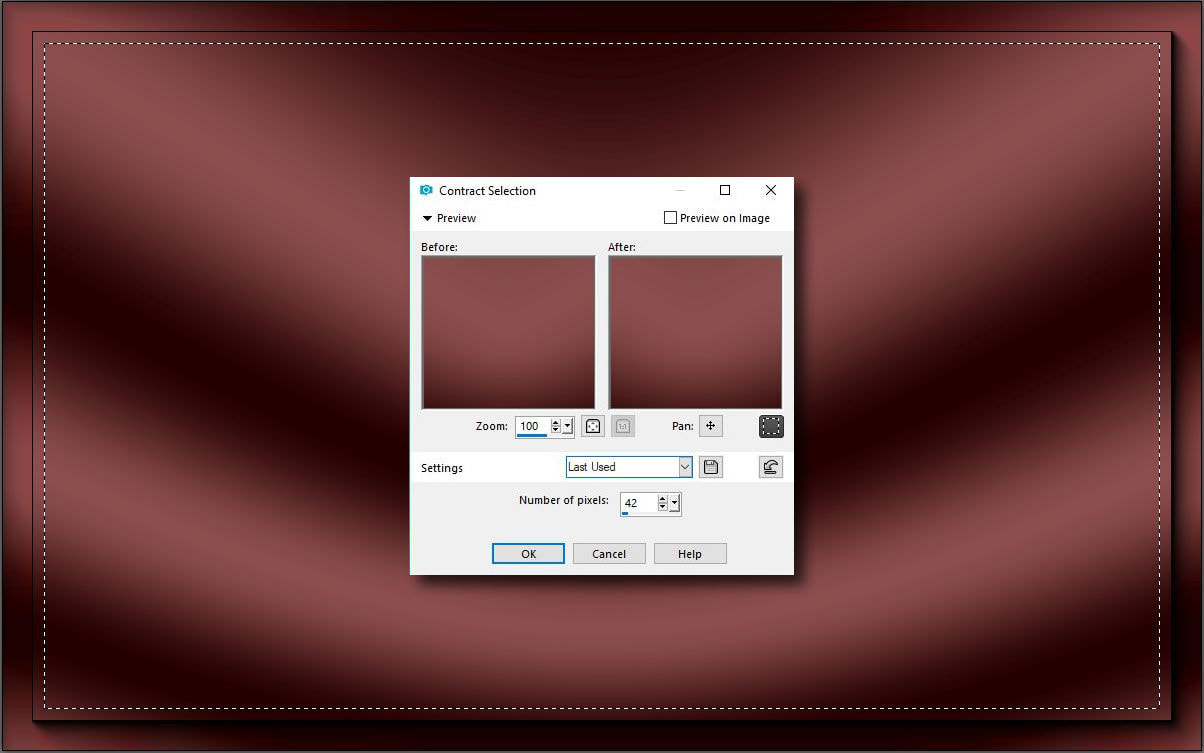
23. Hozd be a Base Imaget és tedd rá ezt a kijelölést.

    Load in the base Image
    Selection - Select All
​    Selection - Modify - Contract 42

Picture

24. Másold be a képedet a kijelölésbe. Szüntesd meg a kijelölést.

​     Copy on your framed image and Paste into selection on base image.
     Selection - Selection None

Picture

25. Helyezd el a feliratodat a képednen és add össze a rétegeket.

    Load in the subtitle from your material package. Copy to your image.
​    Layers - Merge Visible

Picture

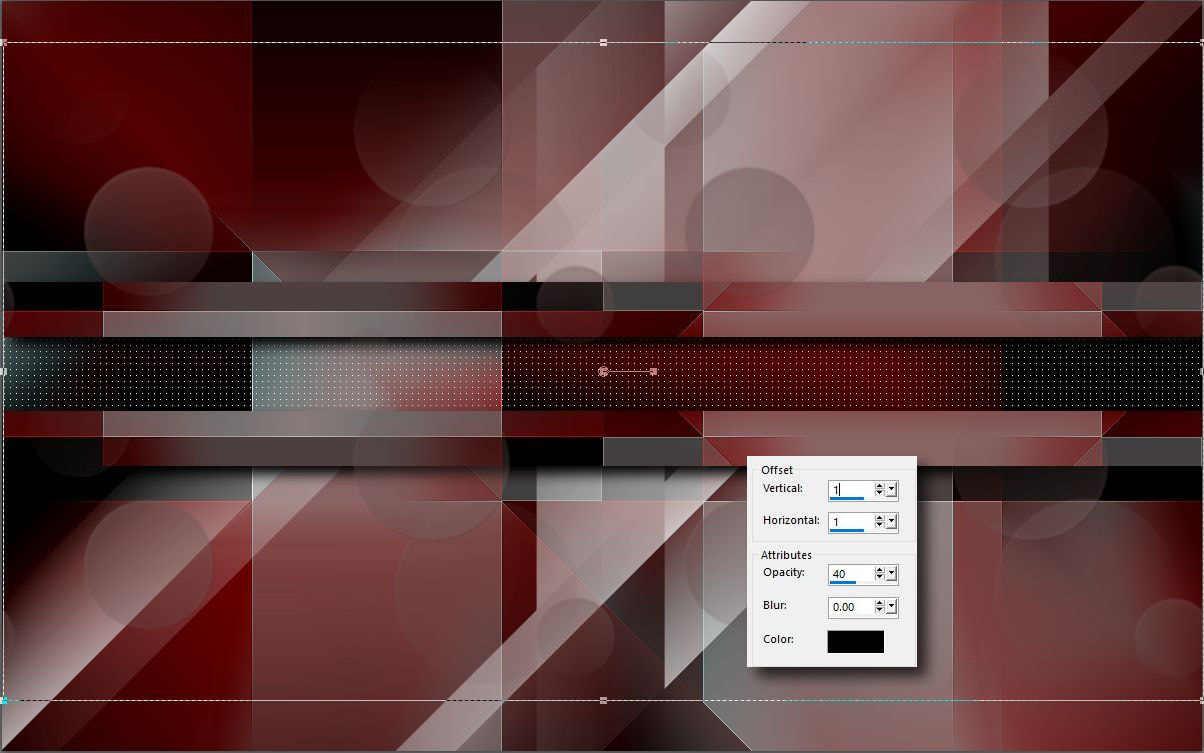
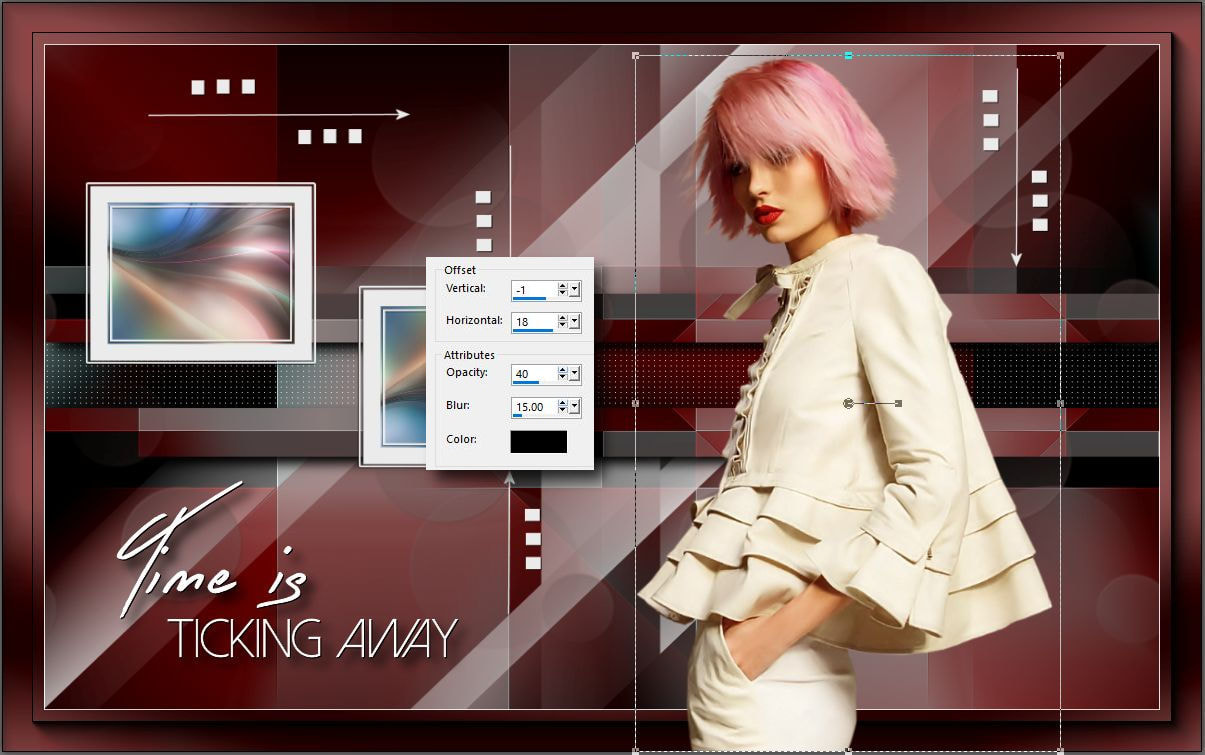
26. Helyezd el az Ana Ridzi tubet és adj neki árnyékot.

    Load in the Ana Ridzi tube and paste into your image
     Effects - 3 D Effects - Drop Shadow -1, 18,40,15

Picture

Gratulálok már készen is vagy. Remélem ez a tutorial is megnyerte a tetszésedet. Most egy kis szünetet tartunk ezen a lapon. A következö tutorialt a szezonálisan megnyitott karácsonyi lapon találjátok majd. Januárban visszatérünk erre a lapra.

Congratulations You're done! I hope you like this tutorial also. Now we have a break on this page. The next tutorial will be on the my seasonally opened Christmas Web Site. In January we will return to this site.

VaZsu Christmas Site
Picture
Proudly powered by Weebly